Mogi WordPress Theme Documentation
First of all, a big thank you for purchasing this theme. This document includes a how-to guide and helpful informations about options and features of the theme.
Support
Please read and search this documentation file before seeking support. If you have any questions that are beyond the scope of this document you can still contact us and open a support ticket here.
Do not use the comment section on the themeforest item page.
This will slow down the support process.
Please make sure that you are using the latest theme and plugin versions before asking for help.
Theme Installation See video tutorial
This theme requires the latest Wordpress version (5.4 and later).
There are 2 different ways to upload/install the theme.
Download "All files & documentation" from your themeforest Download page.
- FTP: Unpack the mogi.zip and upload the unpacked folder into the wp-content/themes/ folder
- WordPress: Login into WordPress and go to Appearance > Add New Themes > Upload. Select the zipped theme file mogi.zip and click Install Now.
Once you have uploaded the theme you need to activate it. Go to Appearance > Themes and you should see the new Theme. Click Activate.
After activating the theme you will see a notice to install required plugins.

Click on "Begin installing plugin" and install them. Note that the installation process can take several minutes!
You can now import the demo content if wanted. (Recommended)
Import Demo See video tutorial
PHP Configuration limits
Make sure to fulfil at least these PHP configuration parameters before importing a demo. You can either increase these limits on your own, or contact your web host.
- max_execution_time 300
- upload_max_filesize 64M
- memory_limit 96M
- post_max_size 32M
You can import the demo content with just one click. Go to Appearance > Theme Options > Import Demo and choose the demo you want import. The importing process can take several minutes.
Please have a look at the Elementor Settings. It is recommended to adapt some settings after the import.
See it here
Update Theme
If you need to update the theme, there are 3 ways to do this:
- Auto Update: Download the Envato Market plugin to get automatic updates for your themes and plugins.https://envato.com/market-plugin/
- WordPress: Deactivate the current theme by activating any other theme. Once the theme is not active you can delete this theme. After deleting it install the new updated theme and activate it. Don't worry, you won't lose your settings,options,content, ...
- FTP: Delete the current theme folder 'mogi' in wp-content/themes/ and upload the new one.
NOTE You won't lose your settings,options,content, ... But if you did customizations to the theme files (edit/add code), they will of course be lost because the files are replaced by the new files. This is the reason why you always should use a child theme to make your customizations.
Update Plugins
If one of the plugins needs an update, a message will appear to update this plugin. Click on "begin updating plugin" and update it.
If this doesn't work, there is a second method to update the plugin. Follow these steps:
- Go to Plugins > Installed Plugins
- Deactivate the plugin in question
- Once deactivated, delete the plugin in question.
- Now you will get a message again, for installing the plugin.
Customize Theme
If you want to make any customizations to the theme, it is recommended to use the child theme. You shouldn't change anything on the original files, because these changes will be lost on the next update.
Theme Options
The theme uses its own Theme options panel which you can access by navigating to Appearance > Theme Options. They give you full control over your website, and you can customize a design without using a single line of code.
Please go through all options to set up your site to the way you want it.
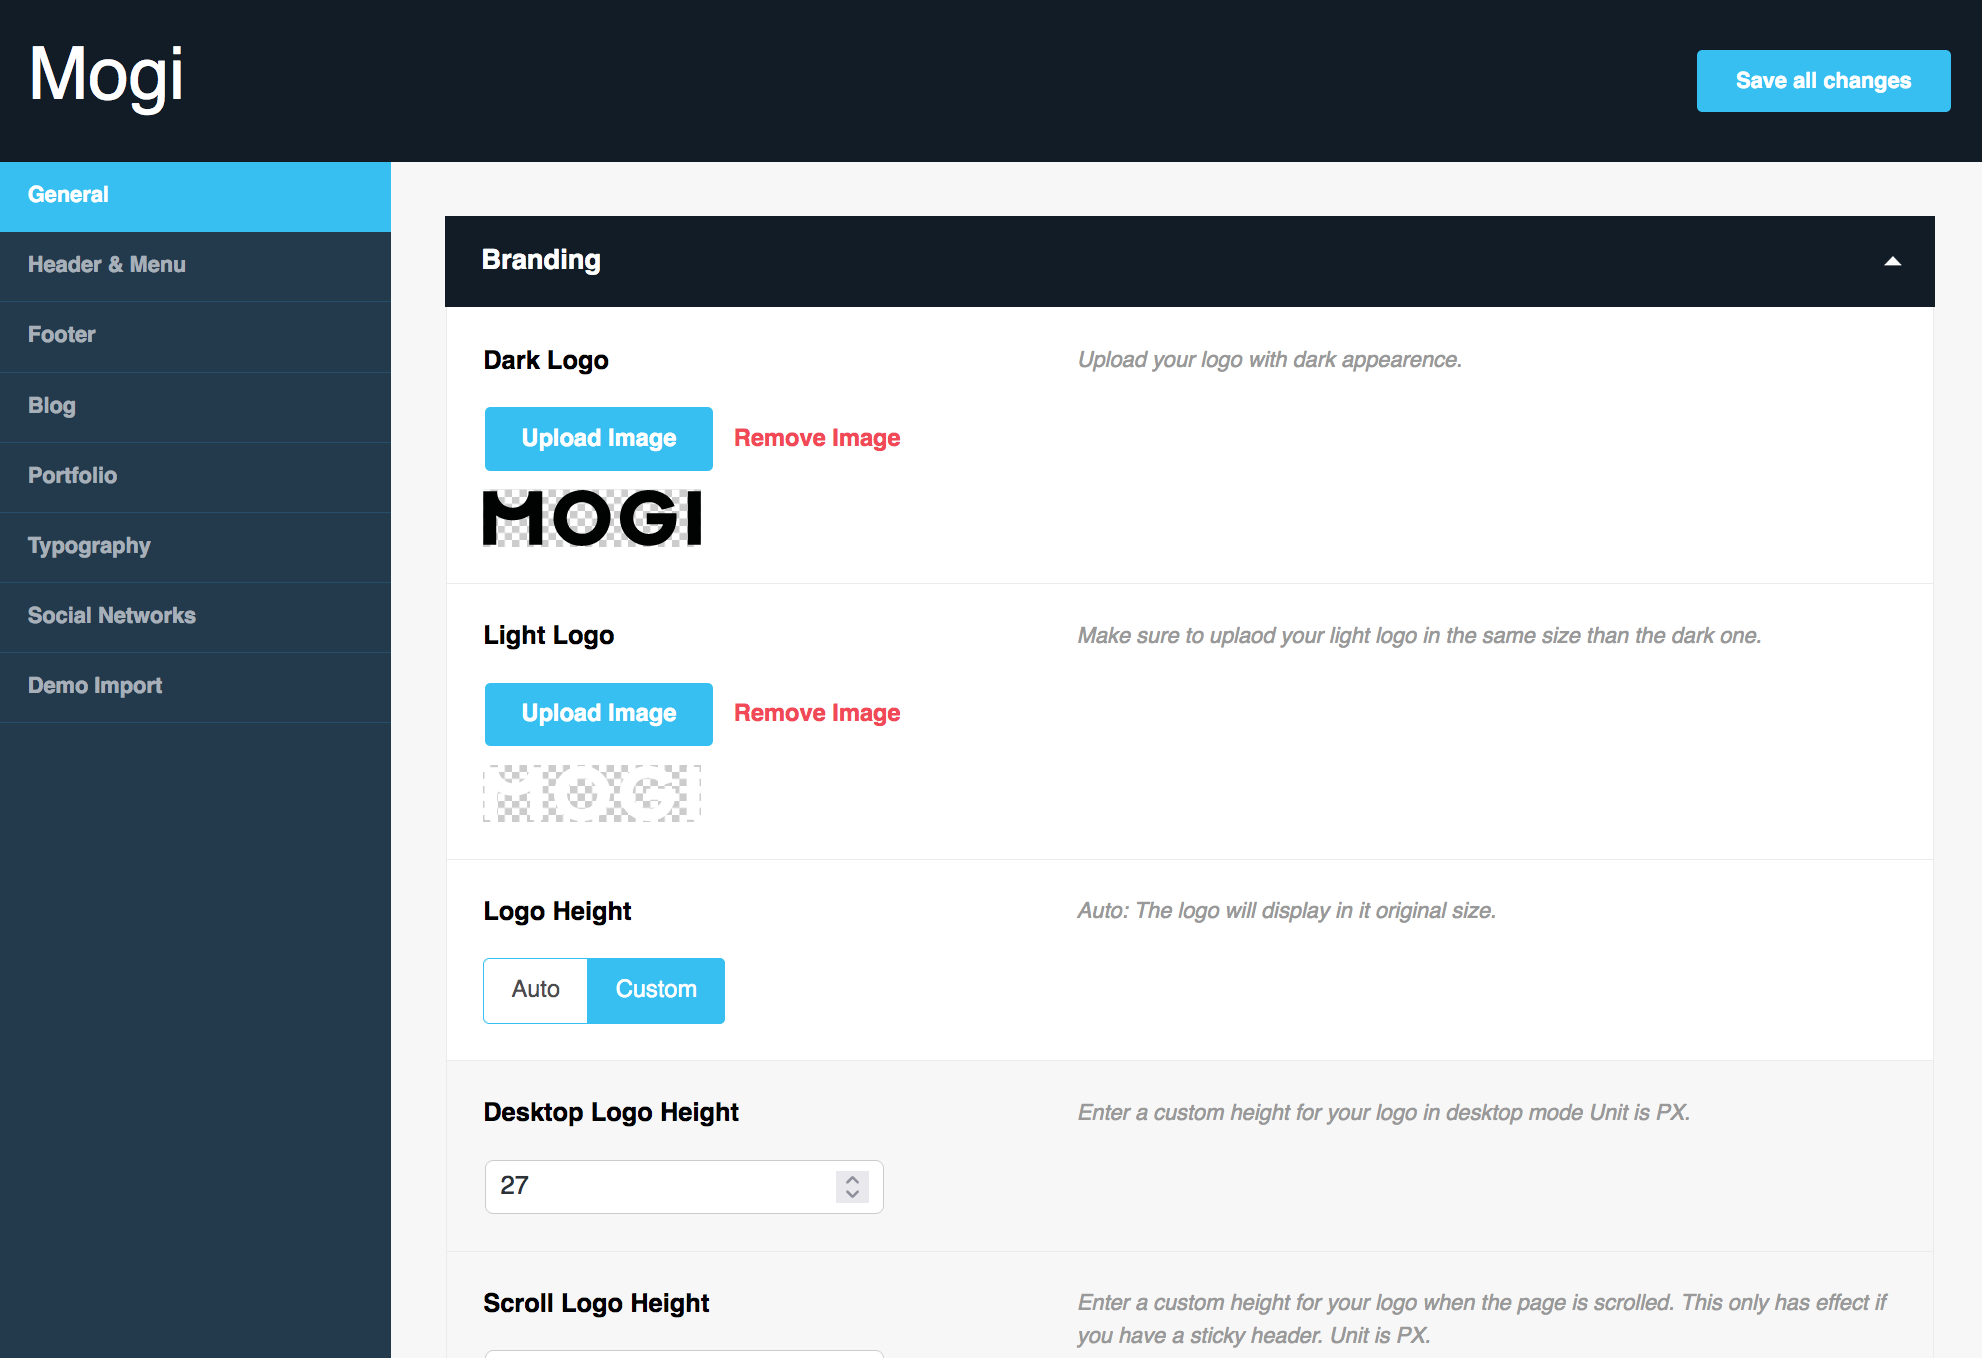
Adding Logo
Please upload your logo in 2 different version to the media library.
- Dark logo
- Light logo
If you want to make your logo retina ready you need to upload the @2x version of your dark + light logo. The @2x version should have double the size of the normal logo.
Example: your dark logo is called dark-logo.png (100px * 40px). Call your retina logo dark-logo@2x.png (200px * 80px) and upload it. It's very important that you upload both logos to the library at the same time/day.
Once you uploaded your logos to the library you can select your Logo in the Theme Options.
- Go to Appearance > Theme Options > General
- Add your Logo(s) by clicking on Upload Image
- Choose your image on your Media Library OR upload a new image and click on Select Image. Make sure to select the normal logo version, not the @2x version.
SVG Logo
By default, WordPress does not allow to upload svg files to their media library. That's why you need to add a plugin which add this feature. There are a lot of plugins out there, and you are free to use the one which suits you the best. We can just say that we have had good experience with Safe SVG
Favicon
You can also upload a favicon to the them options panel. This will only have impact if you did not upload any Site Icon for your Site identity in Appearance > Customize > Site identity. It is recommended to upload a Site Icon instead of the theme option favicon.
Header
Set up your default header appearance layout in the theme options.
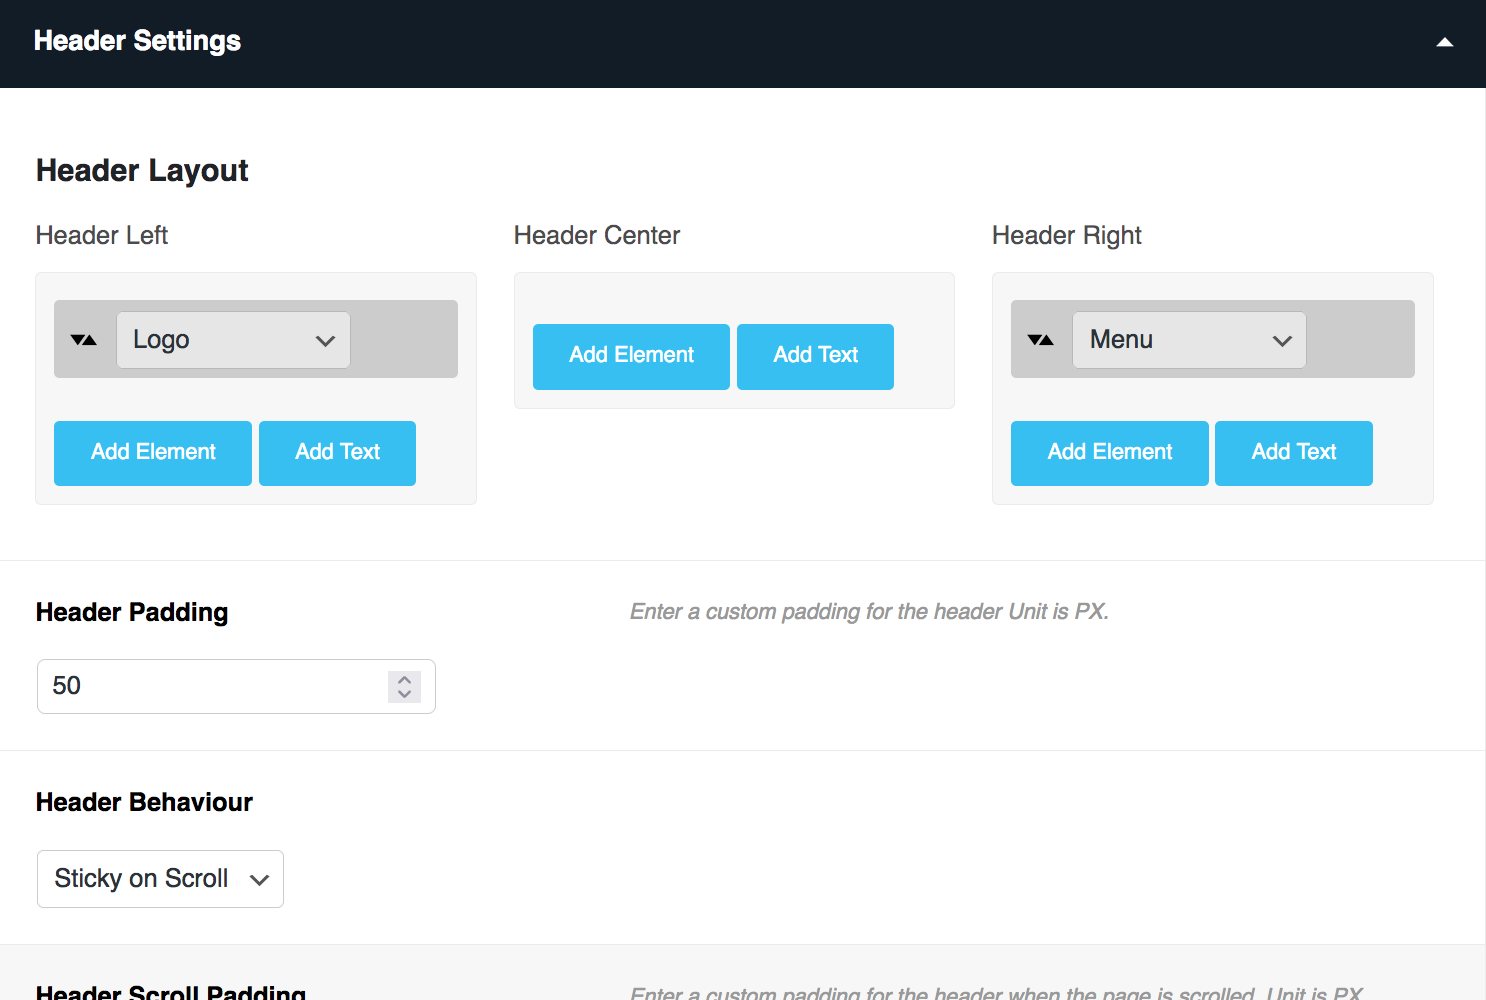
Mogi comes with a custom Header Builder. Add the wanted Elements to the header area wou like.
There are 3 Header Areas:
- Left
- Center
- Right
Menu
If you imported a demo, a menu has also be imported.
Basic Menu
- Go To Apperance > Menu
- Create A New Menu by clicking on create a new menu
- Add your menu items by selecting them on the left side
- Choose a location for your Menu (Primary Menu, Secondary Menu or Third Menu) and save your menu

Now, head to Appearance > Theme Options > Header & Menu and add the Menu Location to the Header area you like.
Typography
This themes gives you full control about your typography and fonts.
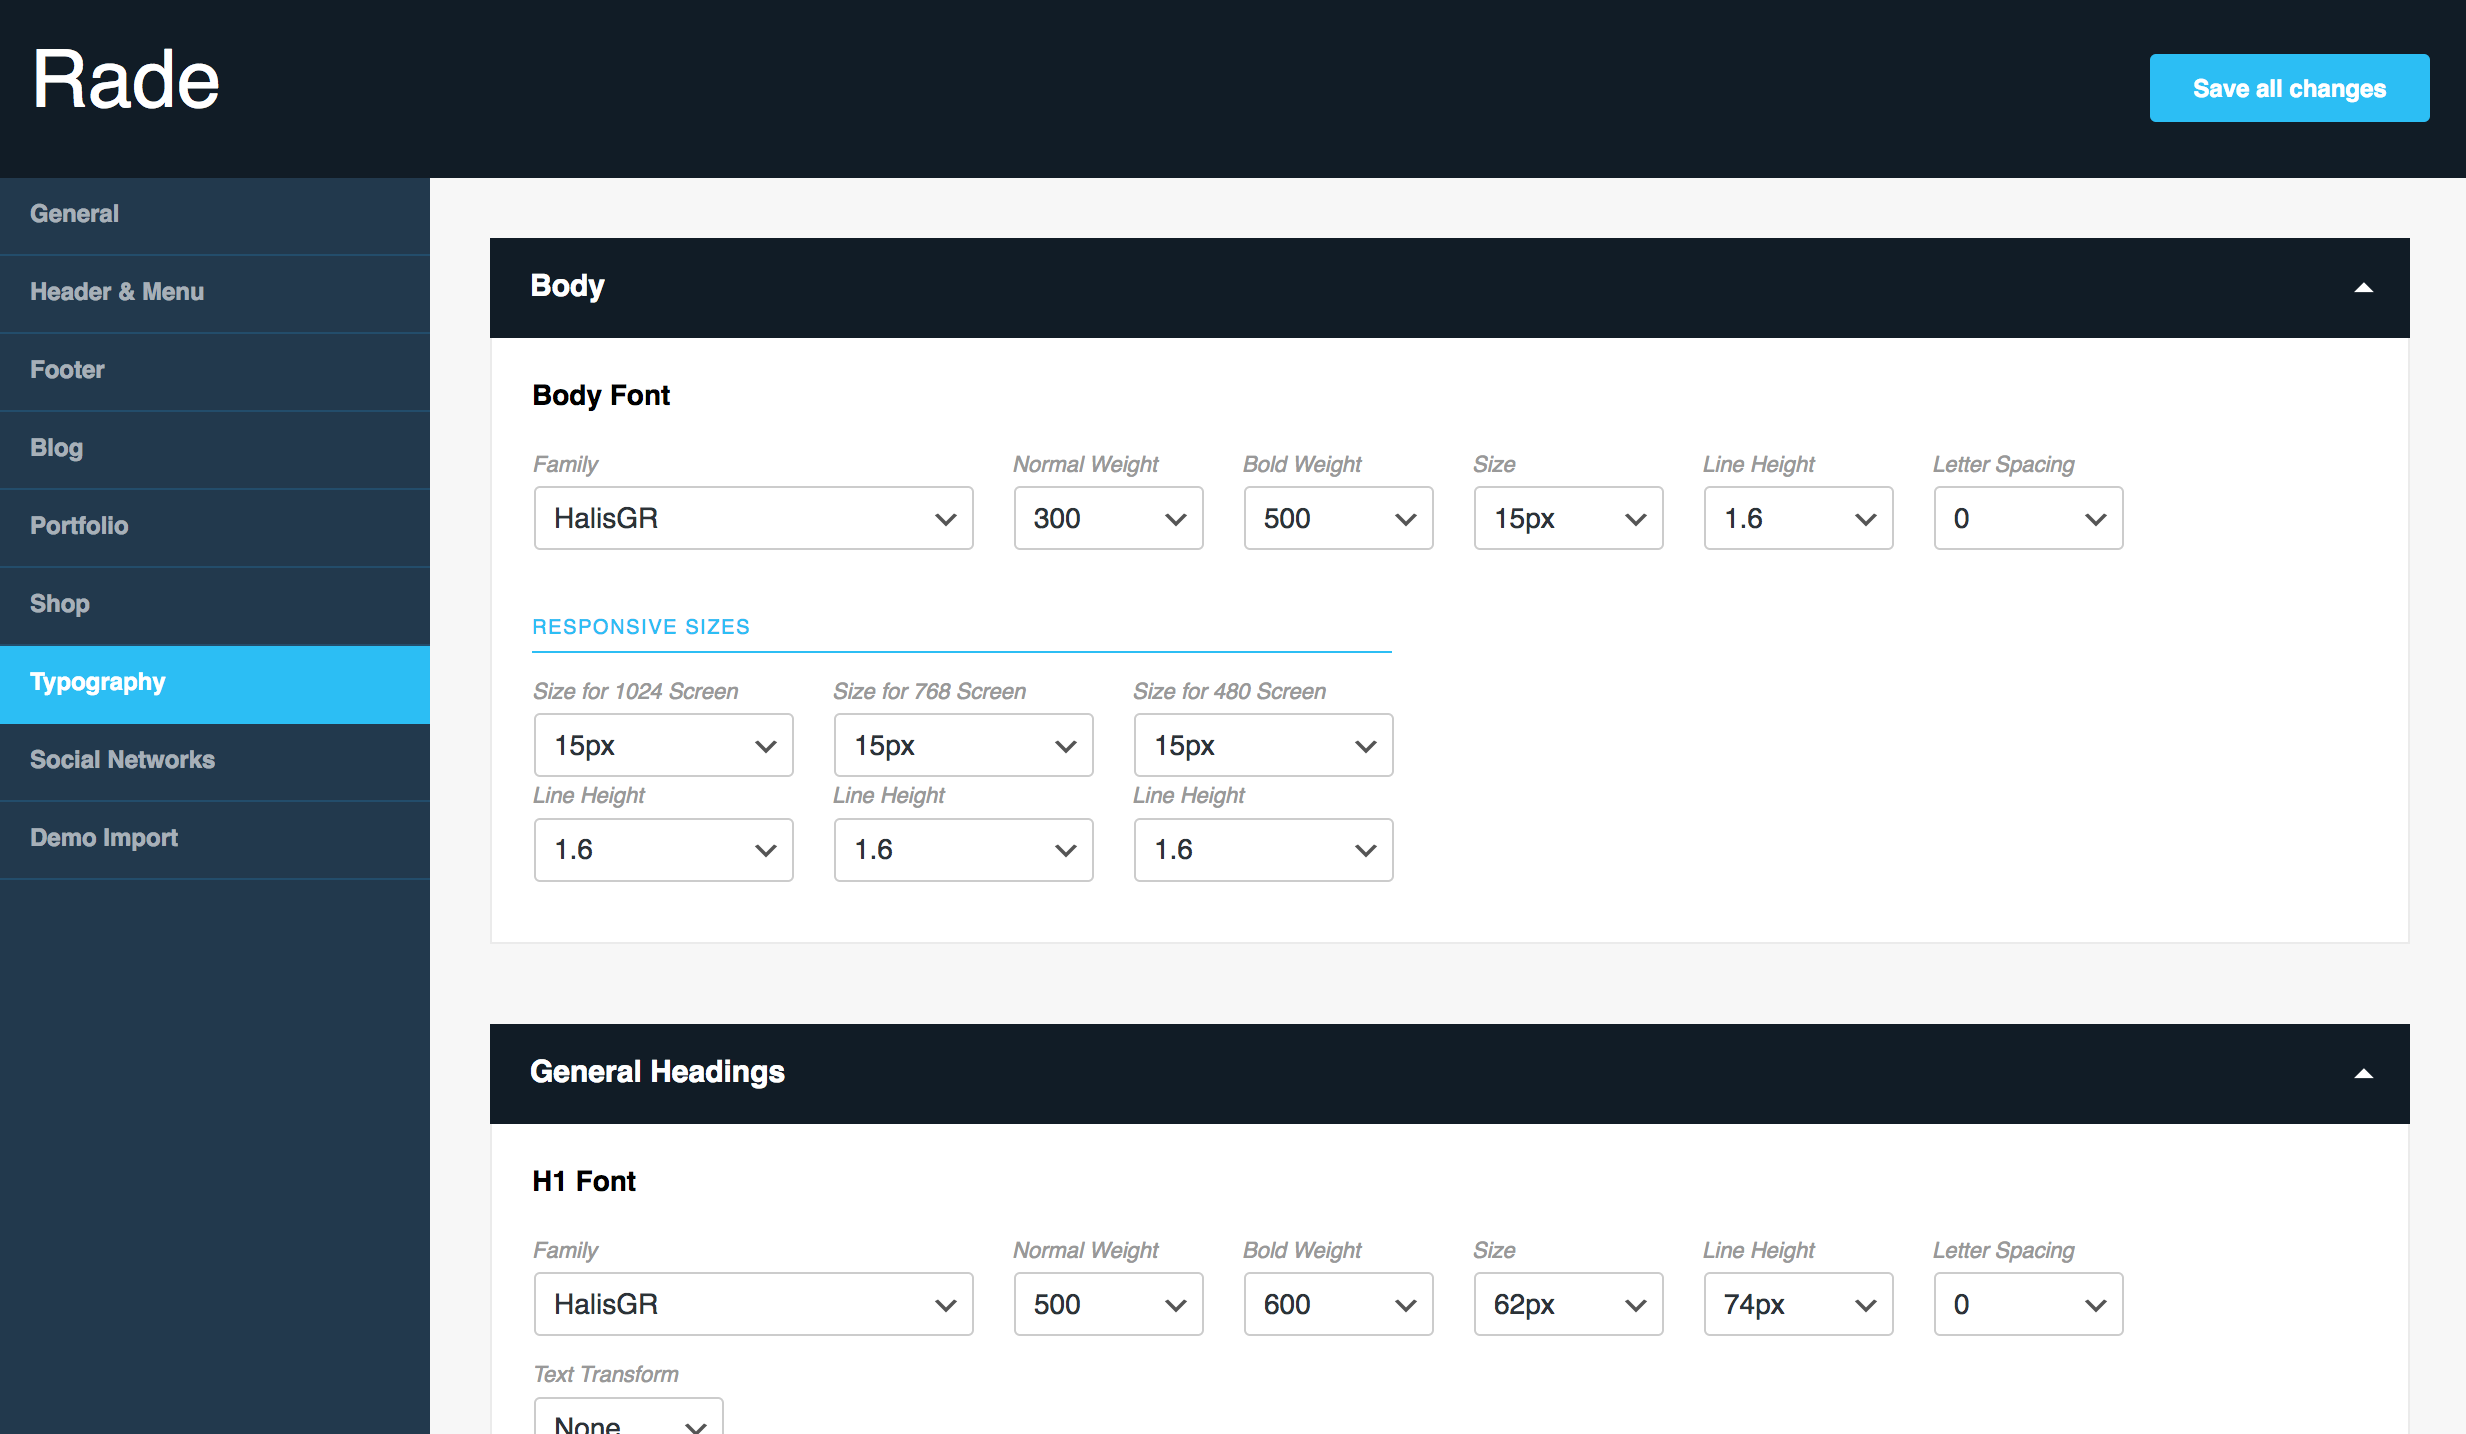
Choose your font and typography settings for the different parts and elements.
Additionally, you can also select different font sizes for different devices.
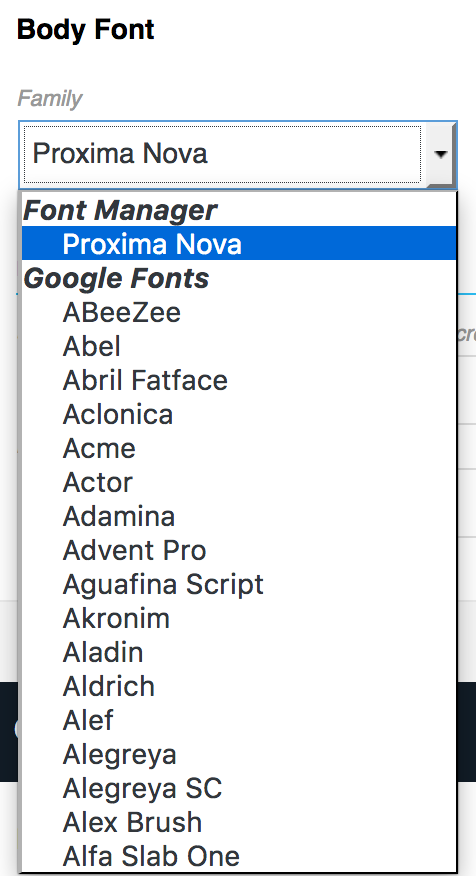
Font Manager
You can add fonts from Typekit or custom fonts. To do so scroll down to the font manager and add a new font.
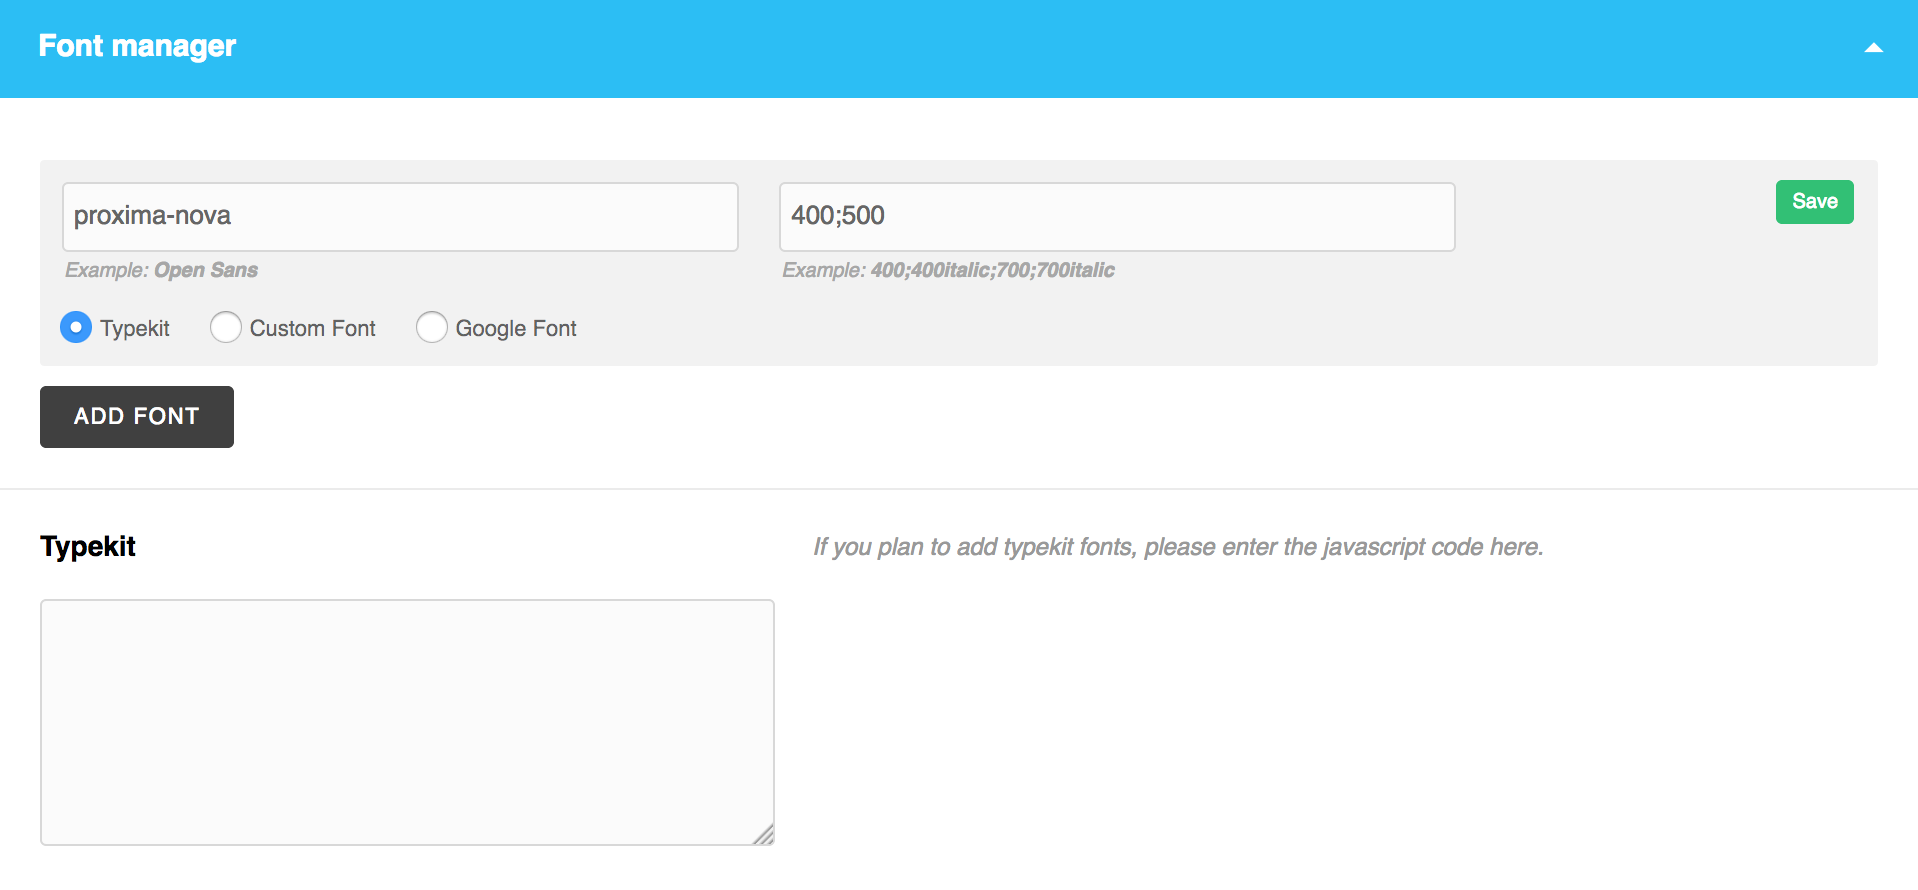
Important It's very important that you enter the correct values for the "Family Name" and "Weights & Style".
Choose your type (Typekit,Custom Font,Google font). Only choose "Google font" when the font does not show in the Font list but is well available on the google font library.
Once you've added the font you can select it on the font list, add the very top.
Typekit
- Add the font(s) to the font manager with the correct values and check the 'Typekit' type.
- Put the ID / TOKEN (which you got from typekit) to the typekit field.
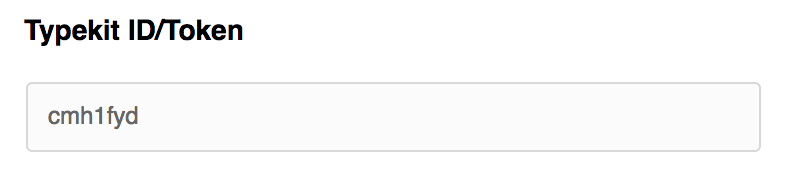
Important For typekit you need to use the familay name typekits gives you. For example:
Proxima Nova would be proxima-nova
Brandon Grotesque would be brandon-grotesque
Custom fonts
Follow these steps if you want to use a customwebfont
- Make sure you have installed the Child theme.
- Copy the folder/files that contain the web font to the Child theme.
- Copy the @fontface CSS, and put it inside the style.css of the theme child, it should look something like the following code example.
@font-face{
font-family: 'MyWebFont';
src: url('folder/WebFont.eot');
src: url('folder/WebFont.eot?#iefix') format('embedded-opentype'),
url('folder/WebFont.woff') format('woff'),
url('folder/WebFont.ttf') format('truetype'),
url('folder/WebFont.svg#webfont') format('svg');
}
MyWebFont is the name you need also to use when adding the font to the font manager - Add the font(s) to the font manager with the correct values and check the 'Custom Font' type.
Blog Setup
First of all, create a page where your Blog posts should be displayed. Once the page is created head to Settings > Reading and choose "A static page" and choose your Blog page you just created for "Posts Page". All your blog posts will be displayed on this page.
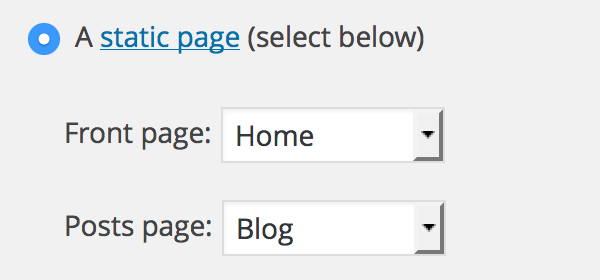
Note If you don't have selected a page for "Front Page" yet, you should select one. This is the main front page (home page) the visitor will see when it visits to your site.
Select also an amount for "Blog pages show at most". This is the amount of posts shown per page.

Head now to Appearance > Theme Options > Blog to setup your general blog layout appearance.
If you choose a layout with sidebar you can add your widgets for the sidebar in Appearance > Widgets.
Add blog posts to any page
The pagebuilder gives you the possibility easily add some posts in any page you want.
To do so, just add a "Blog Posts" Element to the pagebuilder and set up your options.
Blog Posts
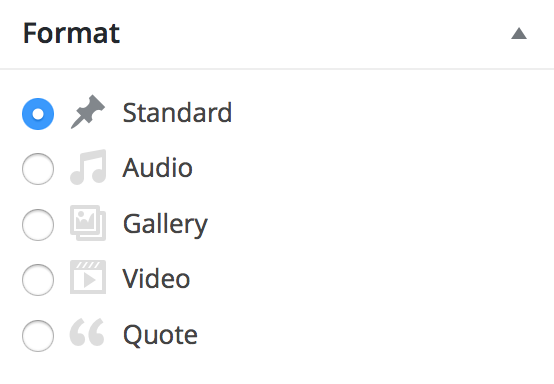
To create blog posts, just go to Posts > Add New.
Select your post format and depending on the forma set up the different options related to your format.
Add now your content to the editor and save the post.
Note You will find further option like sharing, pagination, show date, ... in the theme options.
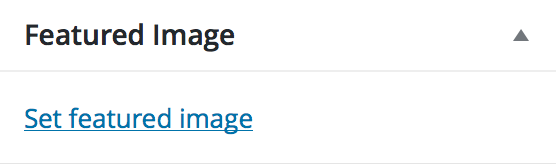
Add Featured Image
Featured Images are very important for this Theme. You should add a featured image to all your posts. This is the image which will "represent" your project (on the grid, sharing, ...). To do so, click on Set featured image and choose your Image.
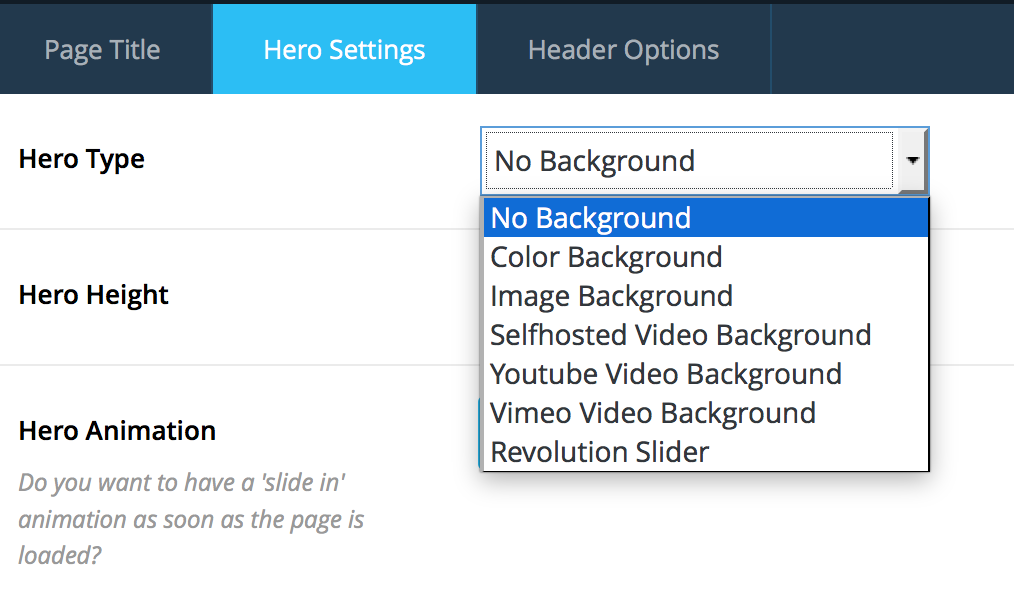
Hero & Page TitleSee video tutorial
The Hero / Page Title is the first content of the page. It can contain a big image,video,slider,etc. or just the name of a page.
You can set up individual hero for each of your page/portfolio/post. Go to your page and scroll down to the "Page Title / Hero Settings".
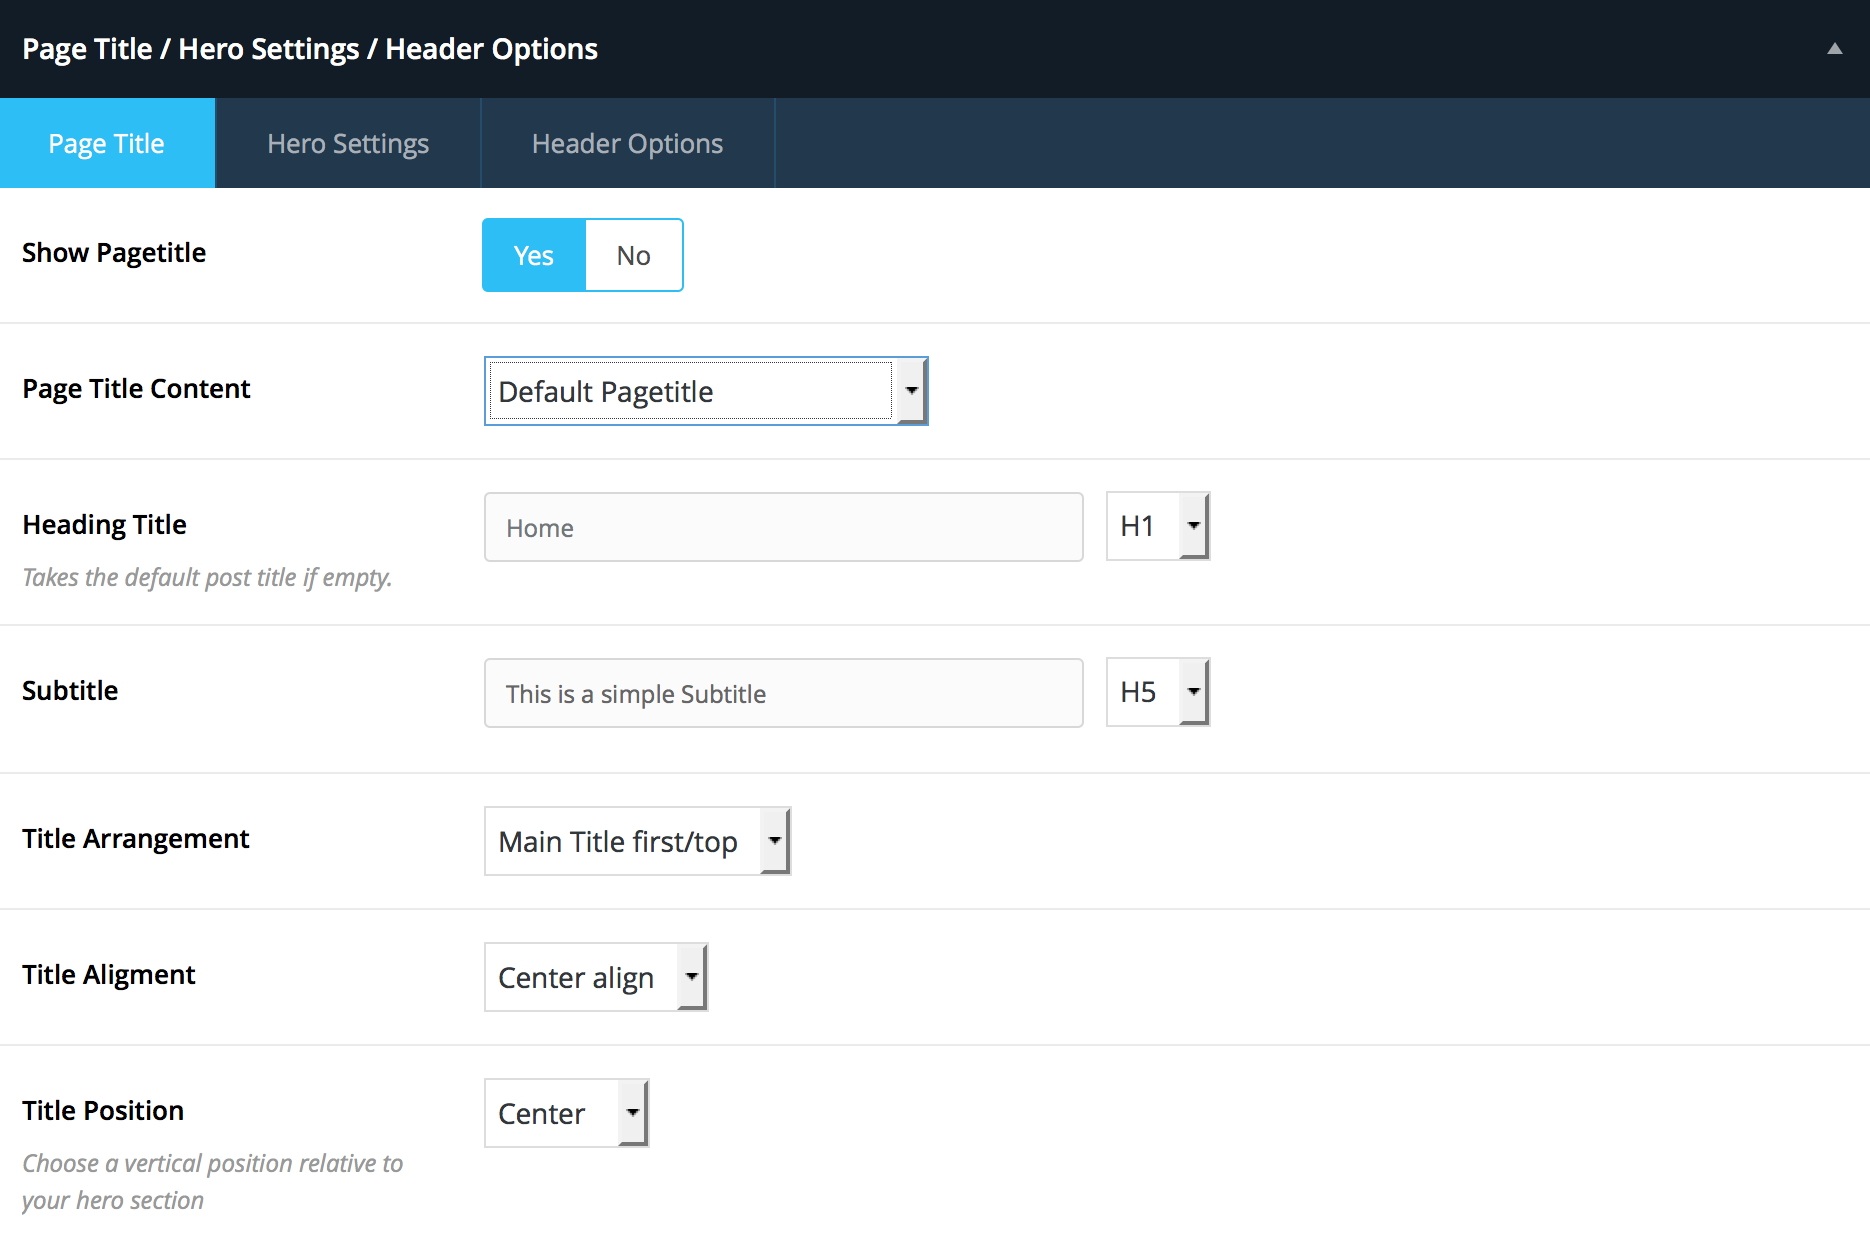
For the hero, you can choose between different background options (color,image,video or slider).
Note If "Show Pagetitle" is off and no background option is selected for the "Hero Type", no pagetitle/hero will be showed and your page starts with the normal content.
Elementor Pagebuilder
This theme uses the great Elementor Pagebuilder.
I recommend to adapt some settings of the Elementor global settings.Go to any page which have the elementor activated and click on "Edit with Elementor". The Elementor Pagebuilder should open. Click on the top left toggle icon and go to:
- Site Settings > Layout. You will find a widget space option. I recommend to set this to "0".
- Site Settings > Lightbox. Set the option for 'Image Lightbox' to "No".
Shortcodes
The Shortcodes mainly are selfexplained. You can access the Shortcodes via the shortcode button (blue "+" button). This allows you to add some small elements like buttons, icons, tabs, etc.

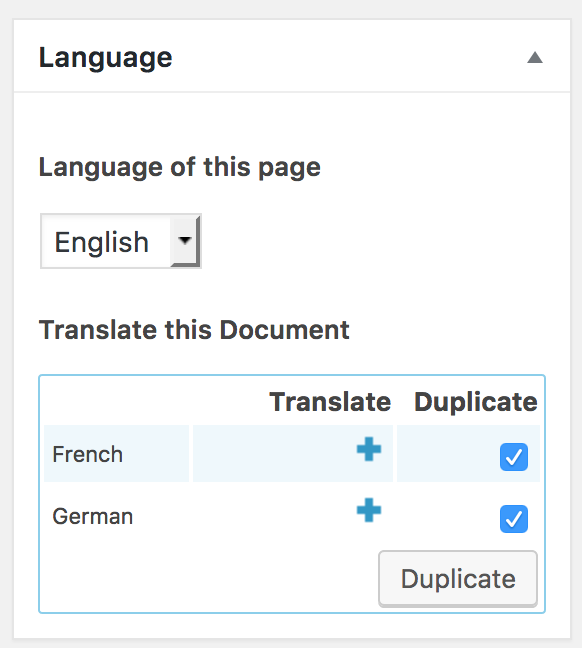
Multilingual / WPML
Mogi is tested and certified by the WPML official team. WPML is the best known WordPress plugin for multi-language websites. WPML makes it easy to build multilingual sites and run them. It’s powerful enough for corporate sites, yet simple for blogs.
Have a look at the WPML Website for more information and documentation.
How to setup WPML with Mogi theme
After you installed the wpml plugin, go through the wpml setup. In the "language Switcher" step, it is recommended to NOT add the switcher to the menu,widget or footer. Instead, activate the Theme switcher in Theme Options > Header & Menu > WPML
Duplicate pages,post for translation
The duplicate option is the recommended option to create the translations for your pages. Because, if you're using the '+' icon to add translation, it will not duplicate the content, and for pages,posts with a lot of pagebuilder elements, you will need to recreate all these elements and structure. So instead, use the duplicate option.
This is the only way you can copy/duplicate the pagebuilder content.
To do so, go to your page,post,portfolio you want to translate and check the Duplicate checkbox of all the languages you want to translate and click on the "Duplicate" button.
Once you've done this the page has been duplicated and you can now edit the wanted language of this page.
When you decide to provide any page,posts,portfolio project in different language, WPML will duplicate this page,post,project for each of your language. This means, If you decide to deactivate the wpml plugin any time later, you will have multiple/duplicated pages,posts,projects.
Translate the theme related words/strings
When making your site multilingual, you will see some theme related words/senteces which you can't change. For example "Next Project" in the single portfolio navigation. You need to install the "WPML String Translation" plugin. Thanks to this you can translate any theme related string.
Duplicate Pages, Posts, Projects
The theme does not have a build in duplicate option but there are tons of plugins which does this. The best plugin, and the one which is compatible with the Mogi theme, is the WP Duplicate posts pages & CPT
Note After duplicating pages, I recommend to manually change the publication date of the duplicated item, in order to have a different date than the original page.
Social Networks
For all social networks you have a profile, please enter the url's of these profiles.
With the shortcode [sr-social style="normal"], you can now display these networks on any part of your website. Usually it is entered into a footer area or menu area.